Have you noticed that the corporate payments ecosystem is fragmented and inundated with fees? For the third-party payment vendors within this ecosystem, that’s the way they like it. They use older technology that incurs the fees and have little incentive to change the status quo.
There’s also a lack of visibility and very little flexibility.
At Trovata, we’re excited to shake things up. As you’ll see, we’re disintermediating the third-party payment providers, allowing you to leverage your bank’s APIs to send out payments directly, even in mass.
In this article, we will share the five steps to get started with payments inside Trovata – a comprehensive and holistic payments experience.
Contents
Prefer to watch instead? Here’s an in-depth demo of Trovata’s Payments Experience.
Before we get started, if you’re unfamiliar with the Trovata payment experience, here’s how it works and some of the benefits.
How Does Trovata Handle Payments?
It’s important to note that Trovata does not process any payments – we help you to orchestrate them within our platform.
You can initiate payments through Trovata, which leverages bank APIs to then send them to the banks directly (without the need for a third party intermediary).
In the end, it’s the banks who are processing the payments and provide back their status information, so you can track them within Trovata.
Benefits of the Trovata Payments Experience
Our team is proud to say that Trovata is the only bank API-based payment experience that replaces bank portals safely, manages approvals, and delivers Real-Time Payment (RTP) capabilities with zero transaction fees.
Key Highlights:
- Send payments securely with zero transaction fees to and from any bank /ERP.
- Handle payments on-the-go with our mobile app.
- Customize your payment workflows, making them as fine-grained as you would like with the option to add stages for review and appproval, with custom rules for added checks.
- Track your payment from the minute it is sent over to the bank until completion.
How to Get Started
Once you have a Trovata account up and running and you have one or more of your banks connected, you can take advantage of our payments feature – at no additional cost!
Here’s how:
1. Get Familiar with the Payments Dashboard
First, make sure you get to know the Payments Dashboard and everything you are able to do within it.
When you click “Payments” in Trovata’s main navigation, you will arrive at your Payments Dashboard which shows you a list of all of the payments that you have ever submitted through Trovata at a glance.
You are able to see the initiation date and their payment ID, which shows whether they were part of a bulk payment (more on those later) or not. In addition to that, you can see the account number, the payment type as well as the status(es) of that payment.
Some of the statuses you will see are Trovata-specific and the other statuses are based on information from the banks.
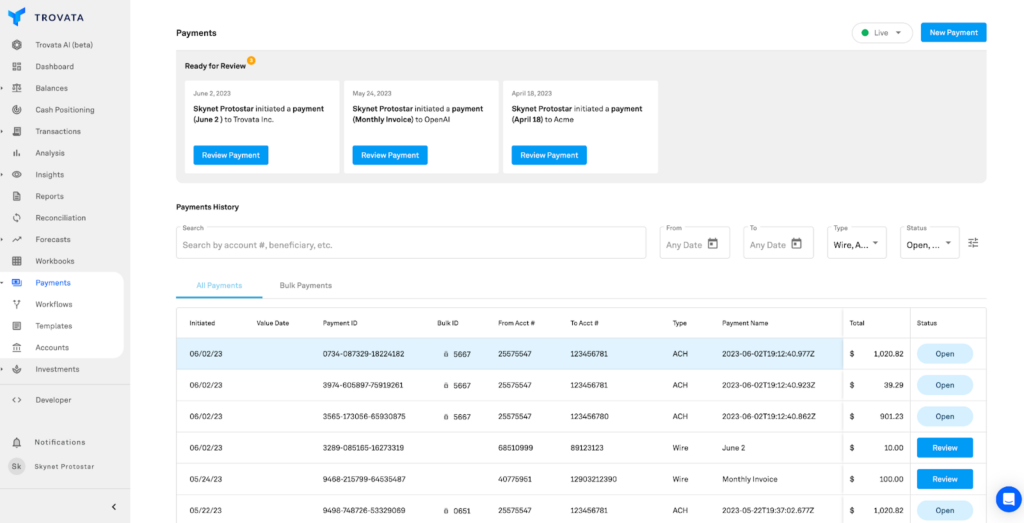
What Can You Do in the Dashboard?
When you come into the Payment Dashboard, you have multiple ways to filter through your payments history. For example, you can filter by date range, type of payment, and by the various payment statuses.
You can also search for individual payments using Trovata’s natural language search. Meaning, you can enter a Google-like search to find a specific account number or beneficiary and be able to see that specific payment.
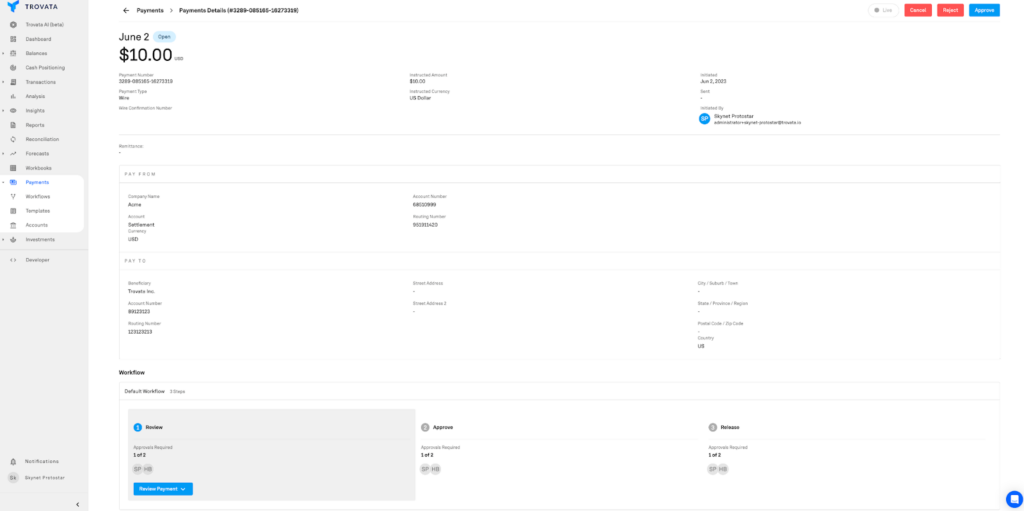
When you click to open up a payment, you’re able to see the full payment details including whether or not it is part of a bulk, so you can see the bulk ID that it’s associated with. You can also see which account the money came out of and then you’re also able to see all the beneficiary information as well. And the most important part is you can see the workflow that was triggered for this specific payment.
Last but not least, from the Payments Dashboard, you can also initiate a payment…
2. Understand the 3 Ways You Can Initiate a Payment
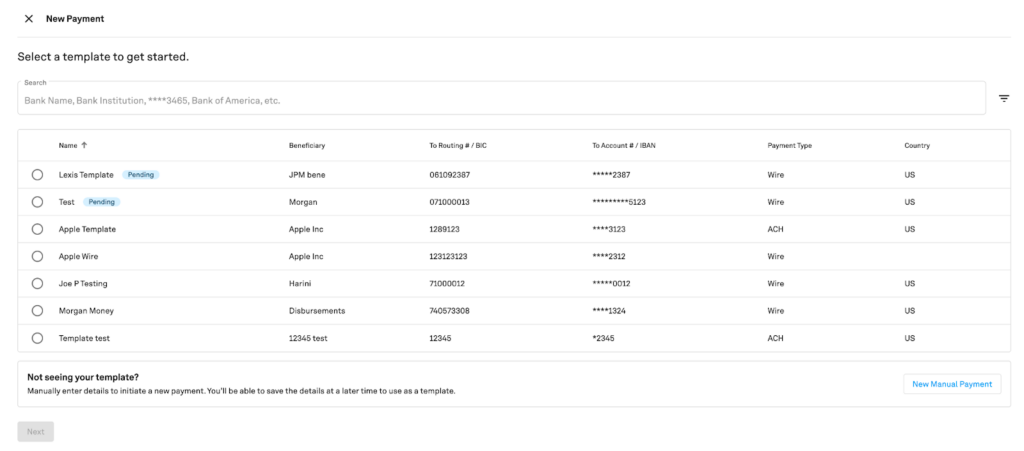
On the left side of the Payments Dashboard, you will find a blue button called “New Payment.”
This is where you can initiate a new payment, choosing from three options: manual, template, or bulk.
Let’s look at each in-depth:
Manual Payments
As it sounds, sending a manual payment flow is very straightforward and will be similar to what you’ve likely experienced when sending a payment via bank portal.
Here’s the process of sending a manual payment:
- Select the account that you want the money to come out of.
- Select your payment type, whether it’s ACH, real-time payments (RTP), transfer or wire.
- Input all of the beneficiary’s information.
- Then, enter the payment amount information.
- Finally, you will be able to review and submit that payment and give it a name.
It’s that easy!
Another great benefit here is that you can choose to send it upon release, which is immediate, or you can actually schedule it to send it out in the future.
Once you submit this payment, whichever workflow is tied to the account that the payment was disbursed from, will be triggered (which we will go over in the next step).
Make a Payment From a Template
To make a payment from a template, the process is very similar. However, the first step is to select from a pre-configured template that you want to use. You will go through all the same steps as above, however, the beneficiary information will be pre-populated for you.
Similar to manual payments, payments from a template can also be scheduled immediately or for a future date.
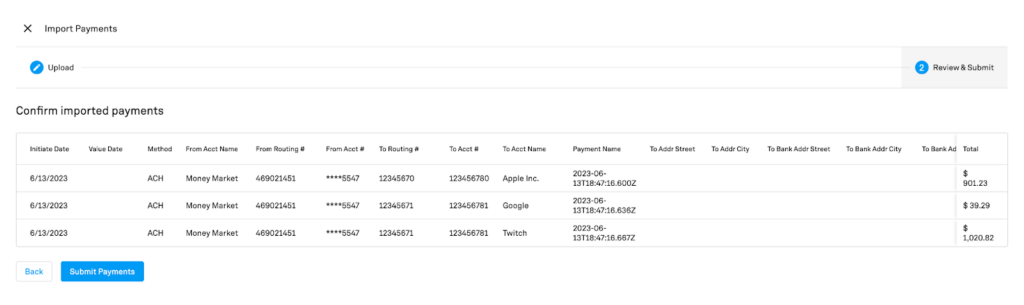
Bulk Payments
Bulk payments are a very exciting feature that we recently released, only available in Trovata. With bulk payments, we allow you to upload a CSV file which can have payments for multiple banks and it can even contain multiple payment types as well.
Currently, Trovata supports bulk ACH payments, but in the next couple of weeks, we will offer bulk RTP and domestic wires as well.
As far as the fields go for the CSV file, we do have format requirements. You can download our CSV template to see exactly how to format the columns.
Once you create the bulk payment template, you can manually upload it via CSV or there is the option to have an automated file upload via an SFTP. If you prefer that process, Trovata can work with you to set you up with an SFTP client so you don’t have to manually upload the CSV.
What’s different about bulk payments versus batch payments?
We created bulk payments to overcome some of the hurdles that teams face when it comes to making batch payments.
When you think about a batch payment, all those payments are going to one specific bank only. Once they’re sent to that bank, you must go through the entire process of un-batching them after they’ve been submitted. And, unfortunately, if one of the payments in the batch fails, the entire batch fails. So that means every single payment in that batch has to now be resubmitted.
Alternately, what happens when you send a bulk payment in Trovata?
You can use multiple banks and multiple payment types and each payment gets submitted as individual payments to the banks. So if one of the payments in the bulk fails, the entire bulk doesn’t fail, the rest of your payments can still successfully be submitted.
Now that you’re familiar with the Payments Dashboard and know the different types of payments, it’s time to set up your payment workflows.
3. Set Up Payment Workflows
The most customizable part of Trovata’s Payment experience, workflows allow you to have as much fine-grained control as possible regarding the payments that you send to the bank.
Workflows are as customizable as possible so that, whether you work in a smaller company with a one-person treasury department, or you’re at a large enterprise that requires several checks and balances to be in place before sending a payment, Trovata can fit your needs.
How to set up a payment workflow:
- First, give your workflow a name.
- Then, add a bank account or accounts to that workflow. This means, anytime a payment is being submitted from those specific accounts, this workflow will be triggered because it’s tied to those accounts. Note, you can have multiple accounts attached to a single workflow, but you cannot have the same account attached to two different workflows.
- Next, input who is allowed to initiate the payment. You can put all the Trovata users in your payment group that you want to be able to initiate a payment.
- Then, you have the option to set a maximum payment amount.
- Now, you can optionally add review and approve steps to the workflow and determine the roles for each. These steps can also have customizable rules that offer more checks. For example, if a payment is greater than $1,000 the approver can only be Jane Doe.
- Finally, input who can release the payment and confirm your workflow and then save it!

4. Configure User Permissions for Payments
Now, you might be asking, “Okay, well, there’s a lot of highly sensitive information when it comes to payments, who is allowed to actually read these payments, who can initiate them, who is allowed to edit workflows, and who’s allowed to edit templates?”
In the settings area of Trovata, you are able to configure those permissions within User Groups.
User Groups are groups of users with a set of permissions that are meant for the entire Trovata app. That means, based on the User Group, you can grant specific permissioning.
For example, if you look at your Admin User Group in Trovata, you can see all the users within it and the permissions they have in the Entitlements section. Looking at payments specifically, for example, you could see that everyone in this User Group is allowed to read a payment, initiate a payment, and so on.
Typically, only the Admin or the Account Owner can update user permissions.
When you onboard to the Trovata Payments Experience, our team will do an in-depth analysis alongside you to make sure we can, first, create the most effective workflows for your needs, and second, ensure the entitlements for your company makes sense for payments specifically, working through permissioning with you.
With workflows and permissions in place, it’s now possible to create your first payment template.
5. Create Your First Template
Again, creating a payment template in Trovata will be similar to how you may have done it before using a bank portal.
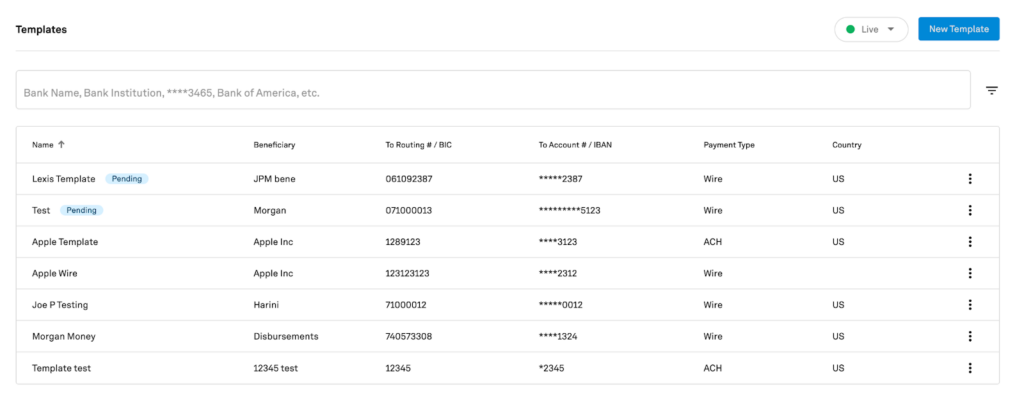
You can set up a new template by navigating to the templates dashboard.
The first step will be to name the template, and then you choose the specific payment type for it – whether it’s ACH, RTP, or wire.
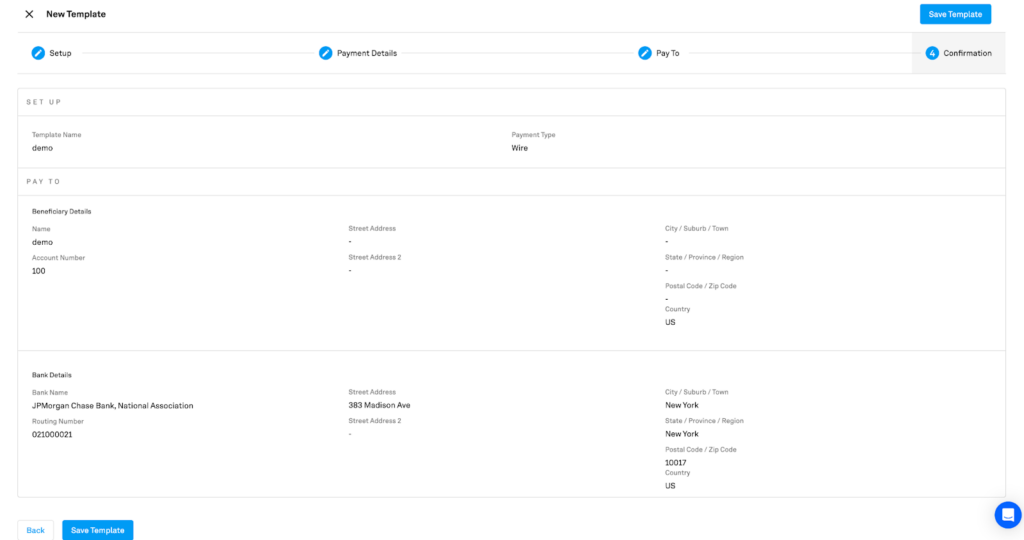
Next, add all of the rest of the information and then you can confirm and save the template.
Once it is saved, you can see all of your templates on the templates dashboard. Then, when you go to create a new payment using a template, all the available template options will come up and once you select a template, all the beneficiary information will be auto-populated for you.
And that wraps up how you can get started with Trovata’s Payments experience!
Trovata Payments FAQ
u003cstrongu003eWhy Would I Want to Send RTP?u003c/strongu003e
One of the newest payment rails in the last 30 years, RTP allows you to submit and complete a payment process almost within seconds. Sometimes you may think, “Okay, I need to do a wire payment because I need my payment to go out fast and quick.” Real time payments actually offer you the same benefits of a wire payment, but for a fraction of the cost. Especially with banks like JP Morgan, in order to leverage RTP, you need to be connected to a third-party payment provider that is connected to JP Morgan’s API rails, or you have to build them in-house. However, with Trovata, you don’t have to do either, because you can leverage the API directly from within our platform. Today, RTP in Trovata is US-specific, but we plan offer it for other countries in the future.
u003cstrongu003eCan You Send International Payments with Trovata?u003c/strongu003e
We’ll be offering international payments starting summer 2023. At first, they will be available for JP Morgan clients, being able to send a payment to the United Kingdom, Germany, Australia, India, Japan, Canada and Poland. From there, we will continue to add more international payments capabilities within Trovata, so stay tuned!
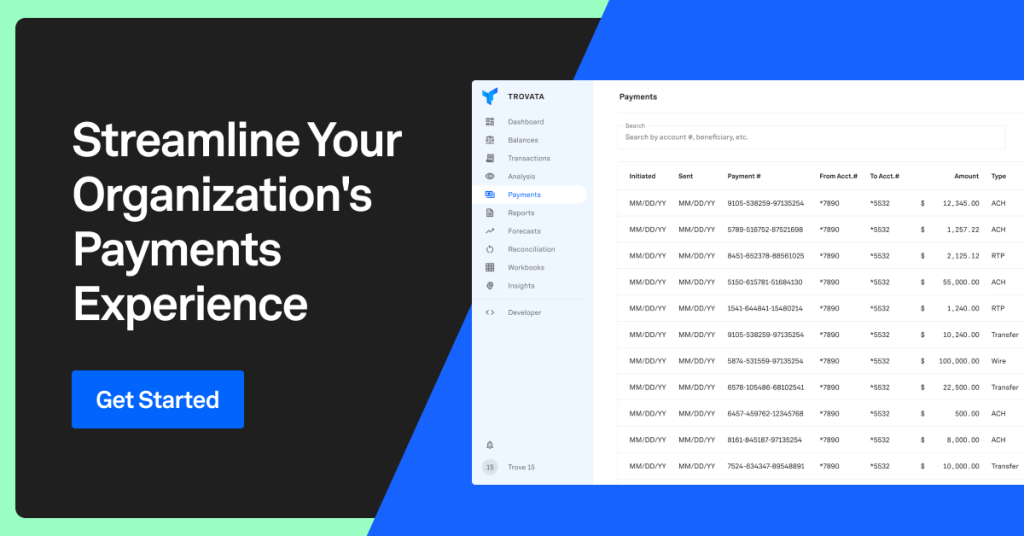
Streamline Your Payments Processes Today
Looking to get started with Trovata and/or our payments experience?
Book a demo to learn more.